ErBlog
-
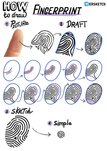
🔏 Fingerprint
It turns out that drawing a fingerprint is almost as complex as drawing a brain. This time we'll also use a template that we'll erase later. A fingerprint is a unique pattern created by skin ridges, which looks quite fractal. It consists of lines of approximately equal thickness that spiral in circles or curve gently. To draw a fingerprint, we'll take a semicircular shape that roughly resembles the shape a thumb would leave if you wet it and press it against paper. We'll draw this shape and gradually begin to fill it in. I started with one curved line and then added new lines around it, bending them. To make the pattern unique, you can add several more lines around which we'll curve the others. Sometimes it's better to break the lines, leaving gaps in them to make it look more realistic. When you've filled in the entire template, remove it, and you'll have a drawing of a fingerprint. -
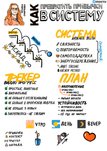
Automating habits
#6 The last lecture of the "Favorite Habits" course. How to combine habits into a system so that they reinforce each other. -
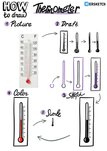
🌡️ Thermometer
A thermometer is an excellent application of the laws of physics. A glass bulb filled with mercury or alcohol. The volume of the liquid depends on the temperature. The warmer the liquid, the higher it rises in the bulb. Simple and reliable. To draw a thermometer, it's enough to depict a bulb. At the bottom, there's an expansion for the liquid, above it - a narrow elongated tube along which a scale is marked. You can add a casing around it, or do without it. -
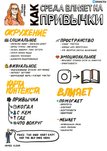
How environment and surroundings affect habits
#5 The fifth lecture of the "Favorite Habits" course, about how to use your surroundings to make life easier. -
🫙 Jerrycan
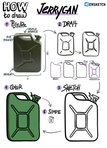
Before we start drawing the jerrycan, we need to talk about it a bit, because it's quite an interesting thing. The fact is that it has many cool design solutions. First of all, it is called a jerrycan because of the Germans who actually designed it. Then, the jerrycan has three handles, so two people can carry it using the outer handles, or one person can use the middle handle, depending on how heavy it is. Next, it has a special air pocket located above the neck, so if you fill it to the brim and then drop it in water, it will float. For rigidity, it has special recesses on the side walls. These also help the canister not to rupture during heating and cooling. The neck is also quite cleverly designed. First, it has a built-in cap. Second, you can't see it in the picture, but there's a special tube in the neck. One end sticks out from the neck, and the other goes into the air pocket. Thanks to this, when you start pouring something from the jerrycan, it doesn't gurgle, and the liquid flows in a steady stream. Now let's start drawing. The body of the jerrycan has an aspect ratio of approximately 4 to 6. In the upper left corner, we'll have a bulge for the air pocket. After we've dealt with the shape, we need to add handles, the neck, and the relief on the side wall. We can also add colors. -
Self-control and failures
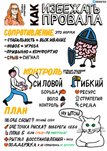
#4 The fourth lecture of the "Favorite Habits" course, about how to start expecting failures and what to do with them. The unfamiliar causes discomfort and resistance. Willpower runs out, so it's worth saving. If you're not making mistakes, you're not doing anything new. -
Naive realism
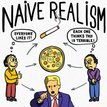
Most of us, most of the time, live with the unquestioned belief that the world looks as it does because that’s the way it is. There is one small step from this belief to another: “Other people view the world much the way I do.” These beliefs, which have been called naive realism, are essential to the sense of a reality we share with other people. We rarely question these beliefs. Noise: A Flaw in Human Judgment Thanks to this feature, people can hold a model of the world in their head without overloading the brain. Because of it, it's difficult to believe that someone with an opposing view is sincere. It's hard to accept that another person has a different world in their head. Instead, it seems that the world is only as we see it, and everyone who disagrees does so to spite us. Hence the accusations of bias, corruption, or stupidity. The world would be cozier if we could feel another person's world, but unfortunately, we cannot. -
🧠 Brain
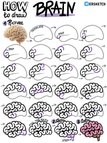
The brain is probably the most complex thing I've drawn. On one hand, it's squiggles of a certain shape. But on the other hand, I tried many times, and it turned out really bad. After a very large number of attempts, I finally got the hang of it. I'll try to explain how today. The easiest way to draw a brain is to first draw a template of its shape. The template will need to be filled with convolutions, and then erased. We begin filling the template with convolutions. One at a time. They shouldn't be too symmetrical or identical. That would look unnatural. They shouldn't be too different either. That would also look unnatural. The thickness should vary only slightly. And the curves shouldn't bend at different angles. Look at a photo of a real brain and keep trying until you feel that it's starting to work out. When the form is completely filled with curves, you just need to color in the spaces and add the brain stem and cerebellum at the bottom. You've got a brain. You're magnificent! -
How to build good habits
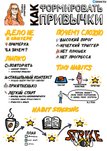
#3 The third lecture of the "Favorite Habits" course, about how to make building habits easier. Habits only stick if they suit us and we understand why we need them. At the start, repeating the action matters more than the quality of the action itself. Habits joined in a chain feed each other 📖 Book recommendation on the topic: Tiny Habits by BJ Fogg. -
🔧 Wrench
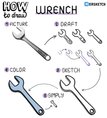
It's better to start with the hole in the head. It's quite simple to draw: two parallel straight lines connected on one side by a curved line. The straight lines are slightly longer. The curved part is needed to fit the corner of the nut. After we've created the hole, it's fairly easy to draw the prongs around it. From them, we continue downward to draw the handle. Make another hole in the bottom of the handle. If desired, you can add volume. -
How to change old habits
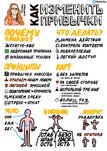
#2 The second lecture of the "Favorite Habits" course. Why are habits hard to change? How to make changing easier? How not to break down along the way? Interesting bits: Friction can be usefully both reduced and increased. It's important to always have a backup plan. -
⛏️ Pickaxe
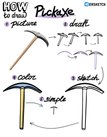
A pickaxe is needed to extract ore in a mine or to till garden beds. On one side it has a sharp point, on the other - a wide blade. All this is attached to a handle, usually made of wood. We'll start drawing the pickaxe with the large arc of its head. After that, we'll add symmetrical curves on the inner side, giving them volume. Then we just need to add the handle. -
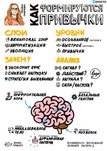
How habits are formed
#1 Today I started the Level One course "Favorite Habits". The first lecture was about habit formation from the neuroscience point of view. Levels of thinking, why people need habits and what they're made of. They're made of a repeating loop: cue, action, reward. -
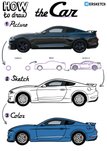
🚗 Car
Sometimes, to draw a picture, the easiest way is to take an existing drawing and trace it. You can use tracing paper, a light screen, or a digital drawing tool. This method works well for machines and buildings. To draw a car, you need a picture with a car. If you know me, then you definitely know which car I'll choose :-) First, you need to draw the wheels. Next - trace the outer contour with a thick, confident line. Then with a thinner line - the details and edges. After that, remove the reference image and add the missing details, shadows, and color. Sounds simple :-) -
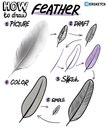
🪶 Feather
Drawing a feather is not complicated. It consists of a central shaft and a vane around it. You can also use lines to show that the vane is made up of small fibers. Basically, that's it. -
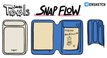
Snap Flow
In mid-July 2024, I supported the Snap Flow project on Kickstarter from Moft, a company that makes various interesting accessories. It's a paper notebook that attaches to the back of your phone with a magnet. The project took a long time to develop, then it took a long time to reach me, and finally, in February this year, it arrived. I unpacked it and used it for some time. Now I'll tell you what this thing is. A book-like cover with a built-in phone stand. Inside, there's a replaceable cartridge with notebooks on the left and space for separate note sheets on the right. You can also attach the current sheet. It has a flat gadget that folds into a small pen and is held by magnets.. An amusing toy. I occasionally draw something in it. -
🐴 Horse
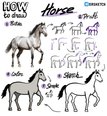
So, the horse. Drawing a horse is not easy, especially if it needs to look like a horse. Here's what I came up with: first, we draw a rectangle with four stick legs and an angular neck and head. Then we add thickness to the legs with strokes so they become somewhat similar to horse legs. Next, we add some details to the tail and mane. This way, it gradually becomes clear which lines form the horse's body. The next step is to try drawing the actual horse, starting with the right hind leg. From it, the belly goes down, and the back goes up. Then the left hind leg, which is behind the belly. The right front leg is in the foreground. The chest continues from the belly, and behind it is the left front leg. Then the neck and head. A horse's head without ears and mane looks wildly similar to a dinosaur's head. Finally, we add ears, mane, tail, eyes, and small details. And we get a horse. -
Mix It Up
Check out the recording of my talk at WSD 2025. It's about how I started drawing sketches and why you might want to draw them too. -
🦉 Owl
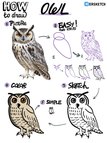
To draw an owl, you just need to complete two simple steps: Draw two ovals Draw the rest of the owl If the simple method doesn't work for you - start with the eyes. Owls have large round eyes with stern eyebrows above them. There's also a beak between the eyes. Around the face, the owl has a rather round head, below it is a fluffy body, and at the bottom is the most difficult part - feet with claws. -
🧦 Socks
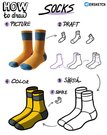
In drawing socks, the main thing is to capture the shape. They hug the foot, so there's a concave part on the sole and above the heel at the back. When the shape is right, you can add details: stripes, colored tips or heels. -
Два по цене одного
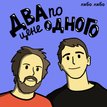
I recently decided to poke around the abandoned podcasts I'm subscribed to and found out that since October 2023 the podcast Два по цене одного has come back to life and new episodes are coming out. A long time ago, back in my life before last, I used to listen to it, and it was fun. I downloaded all the new episodes and listened to them in a couple of weeks. The podcast comes out once a week, so together with Ilya and Alexander I relived the last two years. Some events settled differently in my head, some showed a different side. It was like rereading a book. It was also great to feel that somewhere there are people who, just like me, are trying to figure out how to approach politics, start missing food they used to be indifferent to, and every now and then get freaked out by what's going on. My social circle is small anyway, and after moving to Belgrade it got even smaller, and here two buddies are chatting about life, and it's like I'm sitting with them. It helps. -
☕ Moka pot
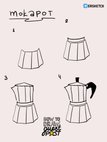
⭐️ Guest post from Katya Bogatyreva! Drawing a coffee machine might be difficult, but a moka pot is simpler. It has definitely become rooted in pop culture; when you draw a moka pot, you can almost smell the coffee. To draw it, I visually divided the coffee maker into several parts: Base, the lower part. Four quadrilaterals or curved trapezoids. The arc that connects the upper and lower parts. Leave space for the "spout" and draw the continuation of the four trapezoids. Add the spout and the triangular lid. Handle on the side and handle on the lid. Done, you're magnificent. If you want to draw a guest post - message me. -
💍 Ring
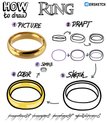
One Ring to rule them all, One Ring to find them, One Ring to bring them all and in the darkness bind them In the Land of Mordor where the Shadows lie. To draw ring, you need a large oval and inside it a smaller oval, shifted towards the edge. And also another piece of oval inside. -
🧷 Safety pin
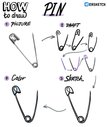
Drawing a safety pin. The safety feature is the cap that covers the needle when closed. The main part of the pin is a steel wire coiled into a spring with extended ends. One end is sharpened, and the other has a protective cap that secures the sharp end thanks to the spring. The most challenging part is drawing the curve of the spring. -
🐋 Whale
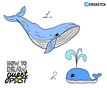
⭐️ Guest post from Tatiana Morozova! Whales are huge and powerful creatures, but at the same time, they are always kind and cheerful in children's books. Let's reflect this in different drawings. To depict a whale realistically, we'll draw the curves of its body in motion, add wrinkles all over the body, especially on the belly. We'll place the eyes at the base of the fin. Regardless of the whale species, we'll color it blue. A cartoon whale is cheerful and friendly. Its rounded body resembles a blue droplet with smooth lines, and a tall curved water spout shoots up above its head. If you want to draw a guest post - message me.